Summary of intracorporeal knot tying techniques under laparoscopy
发布时间:2021-08-24浏览次数:242
Introduction:
The biggest difference between laparoscopic knotting and open surgical instrument knotting is that the position and direction of the instrument are limited by the Trocar fulcrum and angle, and the degree of freedom is not as good as that of open surgical instrument knotting. Therefore, remember that before tying a knot, you must arrange the line shape (such as U-shaped, C-loop, D-loop, hump), so that you can overcome the lack of freedom of laparoscopic instruments to the greatest extent, greatly reduce the number of empty knots, and improve the efficiency of knotting.
Precautions for knotting under laparoscopy:
1. The instrument is generally a left-hand separation forceps and a right-hand needle holder.
2. The suture should have a certain degree of elasticity to facilitate the formation of a coil or hump shape, which is conducive to knotting. Extremely soft silk thread is not suitable for knotting inside the laparoscope.
3. The suture length is more suitable for 12~15cm. Generally speaking, the length of the long thread tail required for knotting is about 5cm~6cm, and the length of the short thread tail is 2cm~3cm. The long thread tail should be moderately loose to facilitate winding, and the short thread tail should be long enough so that it will not be accidentally pulled out of the tissue, but not too long to avoid affecting the clamping line.
4. The left and right operating instruments should be close to each other at the knotting position, and should not be operated far away from the knotting point.
5. Remember that before tying a knot, you must arrange the line shape (such as U-shaped, C-loop, D-loop, hump, etc.), which can maximize the lack of freedom of laparoscopic instruments and improve knotting efficiency.
6. Opening the needle holder when winding helps prevent the coil from slipping from its tip, but it also increases the probability of the suture being stuck between the needle mouths. It can be used according to the specific situation.
7. Use the tip of the separating forceps to clamp the short thread tail near the end.
8. When tying a knot, operate the instrument, knot, and thread tail on the left and right, and the three points should be in a straight line, not in a triangular relationship.
9. When tying a knot, pay attention to the fact that the length of the short thread tail remains basically unchanged.
10. Using the arc of the separating forceps, point the concave surface of the separating forceps tip toward the needle holder. If the concave surface is downward or in the opposite direction of the needle holder, it will increase the difficulty.
11. Moving the left and right instruments together can improve the efficiency of knotting.
C-loop knotting method
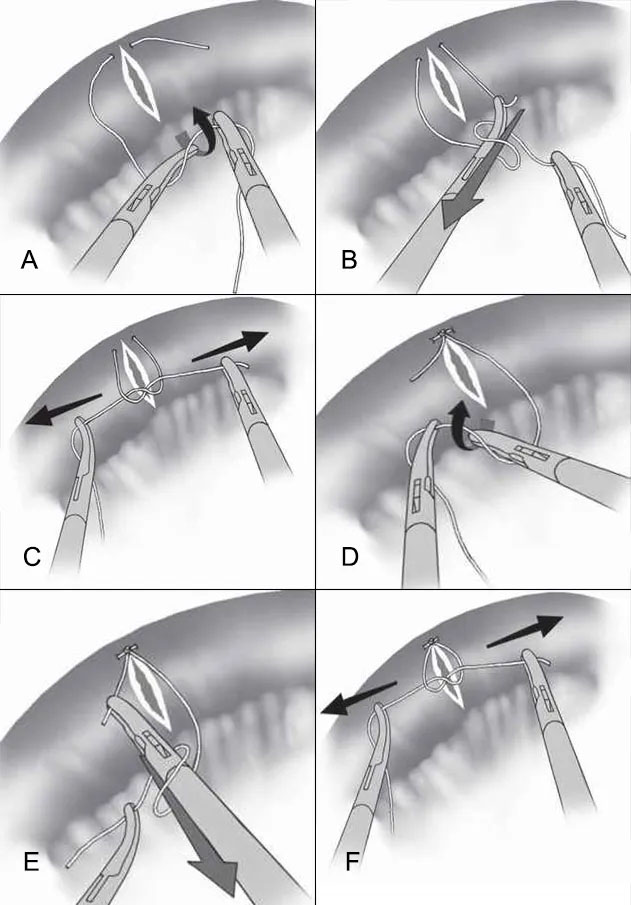
When applying the C-loop knotting technique, the configuration of the C-loop or reverse C-loop is the basic step for subsequent winding, and the direction of suturing must be considered.
If suturing from right to left, the right-hand instrument must grasp the long thread tail to form a loop that is convex to the left and concave to the right (C-loop); the suture is wrapped around the left-hand instrument, and then the short thread tail is pulled through the loop to form a half knot. Next, the left-hand instrument must grasp the long thread tail to form a loop that is convex to the right and concave to the left (reverse C-loop); the thread is wrapped around the right-hand instrument, and then the short thread tail is pulled through the loop to complete the second half knot.
If suturing from left to right, the left-hand instrument should be used to form a reverse C-loop to make the first half knot, and then the right-hand instrument should be used to form a C-loop to make the second half knot.
Take the example of suturing from right to left, with the right-hand needle gripper and the left-hand grasper alternating to tie knots:
The right-hand needle gripper grasps the suture and passes through the tissue, leaving a short tail on the caudal side. The right-hand needle gripper re-grasps the suture adjacent to the needle after passing through. The right-hand needle gripper then grasps the long tail and forms a "C loop". The left-hand grasper is placed over the loop. The right-hand needle gripper wraps the long tail around the immobile tip of the left-hand grasper. The left-hand grasper grasps the short tail and then pulls to the left to complete the first half-knot. Keeping the left-hand grasper's jaw open before grasping the short tail may help prevent the loop from slipping off its tip. For the first half-knot, a simple square knot should be used for braided sutures, while a surgical knot should be used for monofilament sutures.
For the second, opposite half-knot, the left-hand grasper creates a "reverse C loop". The right-hand needle gripper is placed over the reverse C loop, and the left-hand grasper wraps the thread around the right-hand needle gripper. Move the tips of the left and right hand instruments together toward the short thread tail, and grab the short thread tail with the right hand needle holder. Pull the short thread tail back through the loop and pull the two thread tails in opposite directions parallel to the stitch under equal tension to complete the second half knot.

A. Grasp the long thread tail with the right hand needle holder and form a "C loop". Wrap the suture around the left hand grasper
B. Grasp the short thread tail and pull it back through the loop
C. Complete the first half knot
D. Create a "reverse C loop" with the left hand grasper and create the second half knot by wrapping the thread around the right hand instrument
E. Pull the short thread tail back through the loop
F. Complete the second half knot
Hump knotting method
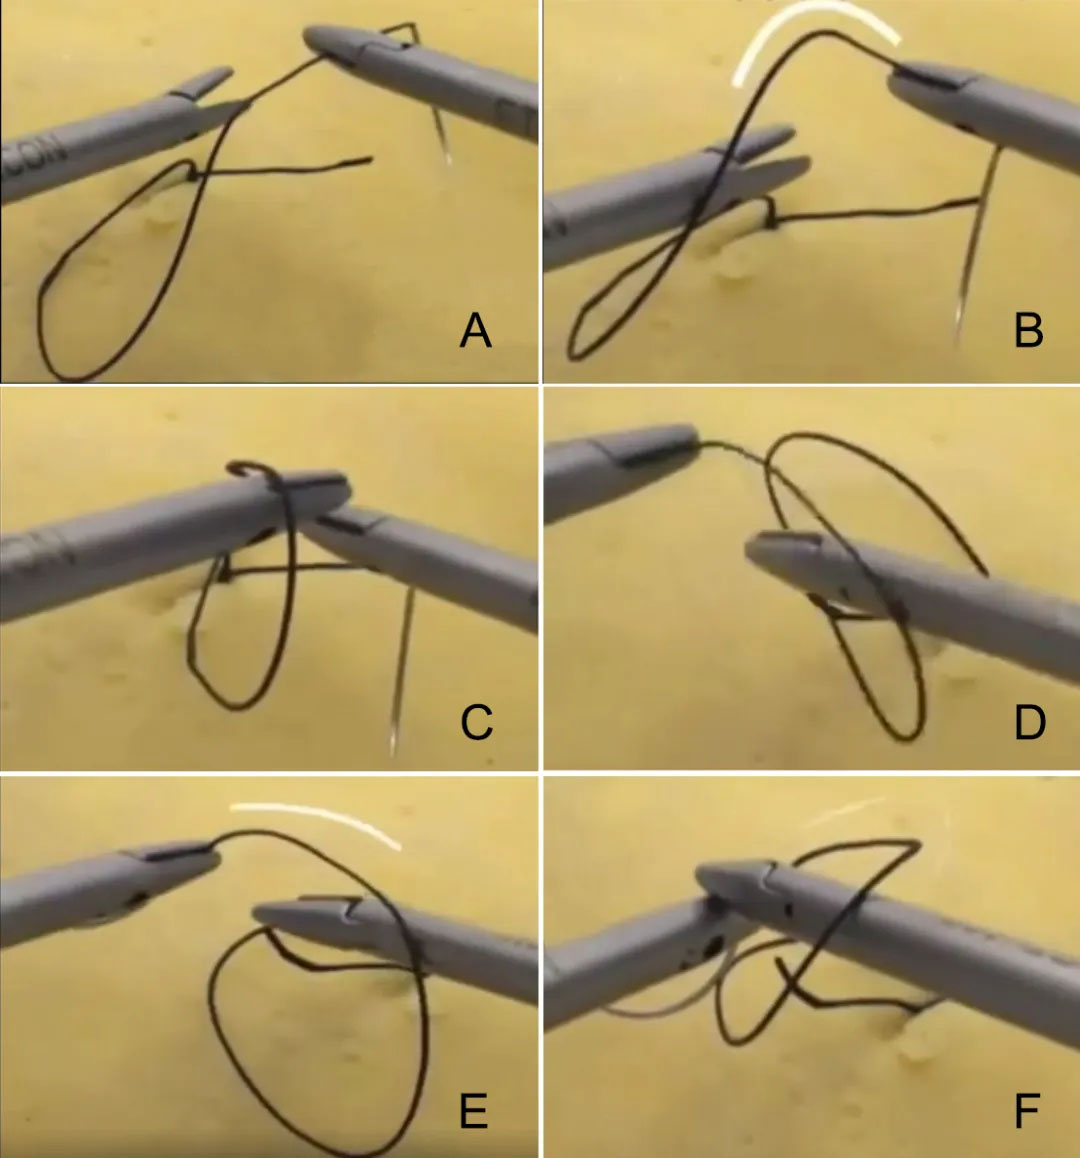
The characteristic of this method is: rotating the instrument that grasps the long thread tail makes the suture hump-shaped.
Take the left hand grasper and the right hand needle holder as an example of alternating knotting:

A. Hold the tail of the long thread with the needle in the right hand
B. Rotate the needle in the right hand that holds the tail of the long thread so that the part of the suture connected to the needle in the right hand is in the shape of a hump
C. Pass the left hand grasping forceps from under the hump and over the right hand grasping forceps to tie the first half knot
D. Hold the tail of the long thread with the left hand grasping forceps
E. Rotate the left hand instrument so that the part of the suture connected to the left hand grasping forceps is in the shape of a hump
F. Pass the right hand grasping forceps from under the hump and over the left hand grasping forceps to tie the second half knot
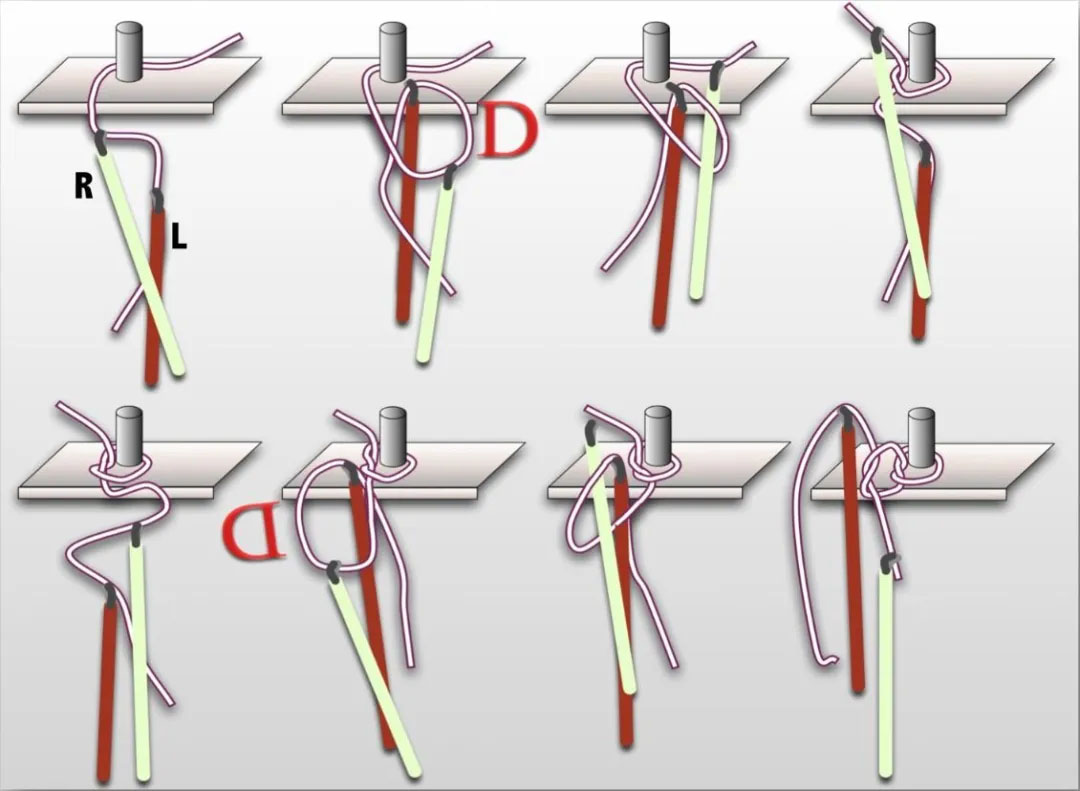
Single-hole laparoscope D-ring knotting method
The sleeves are positioned as follows: the right sleeve is slightly above the left sleeve (9 o'clock and 2 o'clock). A distance of 2 cm between the two sleeves is sufficient for this operation.
The right-hand needle holder grasps the center of the long thread tail. The left-hand grasping forceps grasp the long thread tail 5 cm from the end. Pull the right-hand needle holder and push the left-hand grasping forceps under the long thread tail to form a "D loop" with the suture and the shaft of the left-hand grasping forceps. Then, the right-hand needle holder lets go of the long thread tail and inserts into the loop to grab the end of the short thread tail and pull the short thread tail back to form the first half knot of the square knot.
Next, the right-hand needle holder grasps the center of the long thread tail again to form a "reverse D loop". The right-hand needle holder inserts into the loop again, grabs the end of the short thread tail, and pulls the short thread tail back to complete the second half knot of the square knot.

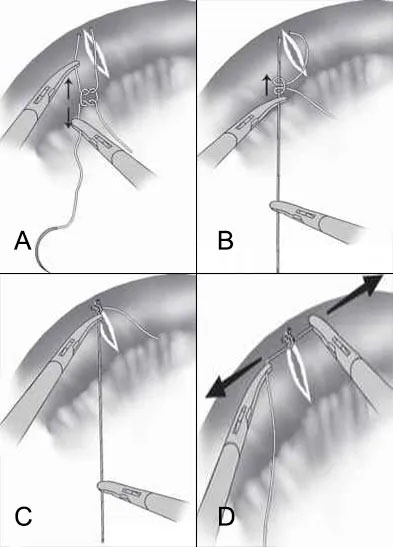
Sliding knot to square knot
If the first knot becomes loose when you start the second knot, you can convert the first locking square knot to a sliding knot by pulling the long tail until it is straight (at least in the case of monofilament suture material). You can then push the knot down the long tail into place and convert it back to a square knot by applying pressure on the long and short tails to ensure the stability of the knot.

A. Pull the long line tail in the opposite direction
B. Form a slip knot
C. Tighten the slip knot
D. Convert the slip knot back to a square knot


